Authorize.Net configuration guide
This guide walks you through collecting the required Authorize.Net credentials, configuring Authorize.Net Webhooks, and saving the connection in the EFundPay Dashboard.
You need three values from the same Authorize.Net account and environment:
| EFundPay field | Authorize.Net value | Purpose |
|---|---|---|
API Login ID | API Login ID | Identifies your Authorize.Net merchant account for API requests. |
Transaction Key | Transaction Key | Authenticates payment, query, refund, and void API requests. |
Webhook Signature Key | Signature Key | Verifies the X-ANET-Signature header on Authorize.Net webhook notifications. |
API Login ID, Transaction Key, and Signature Key are credentials. Do not include them in screenshots, tickets, chat messages, client-side code, or source control.
1. Select the correct environment
Use the Authorize.Net Merchant Interface that matches the environment you will select in EFundPay:
- Sandbox: https://sandbox.authorize.net/
- Production: https://account.authorize.net/
Sandbox and production accounts use different credentials. A sandbox credential will not work when the EFundPay connection environment is PRODUCTION, and a production credential will not work when it is SANDBOX.
2. Open API Credentials and Keys
In the Authorize.Net Merchant Interface:
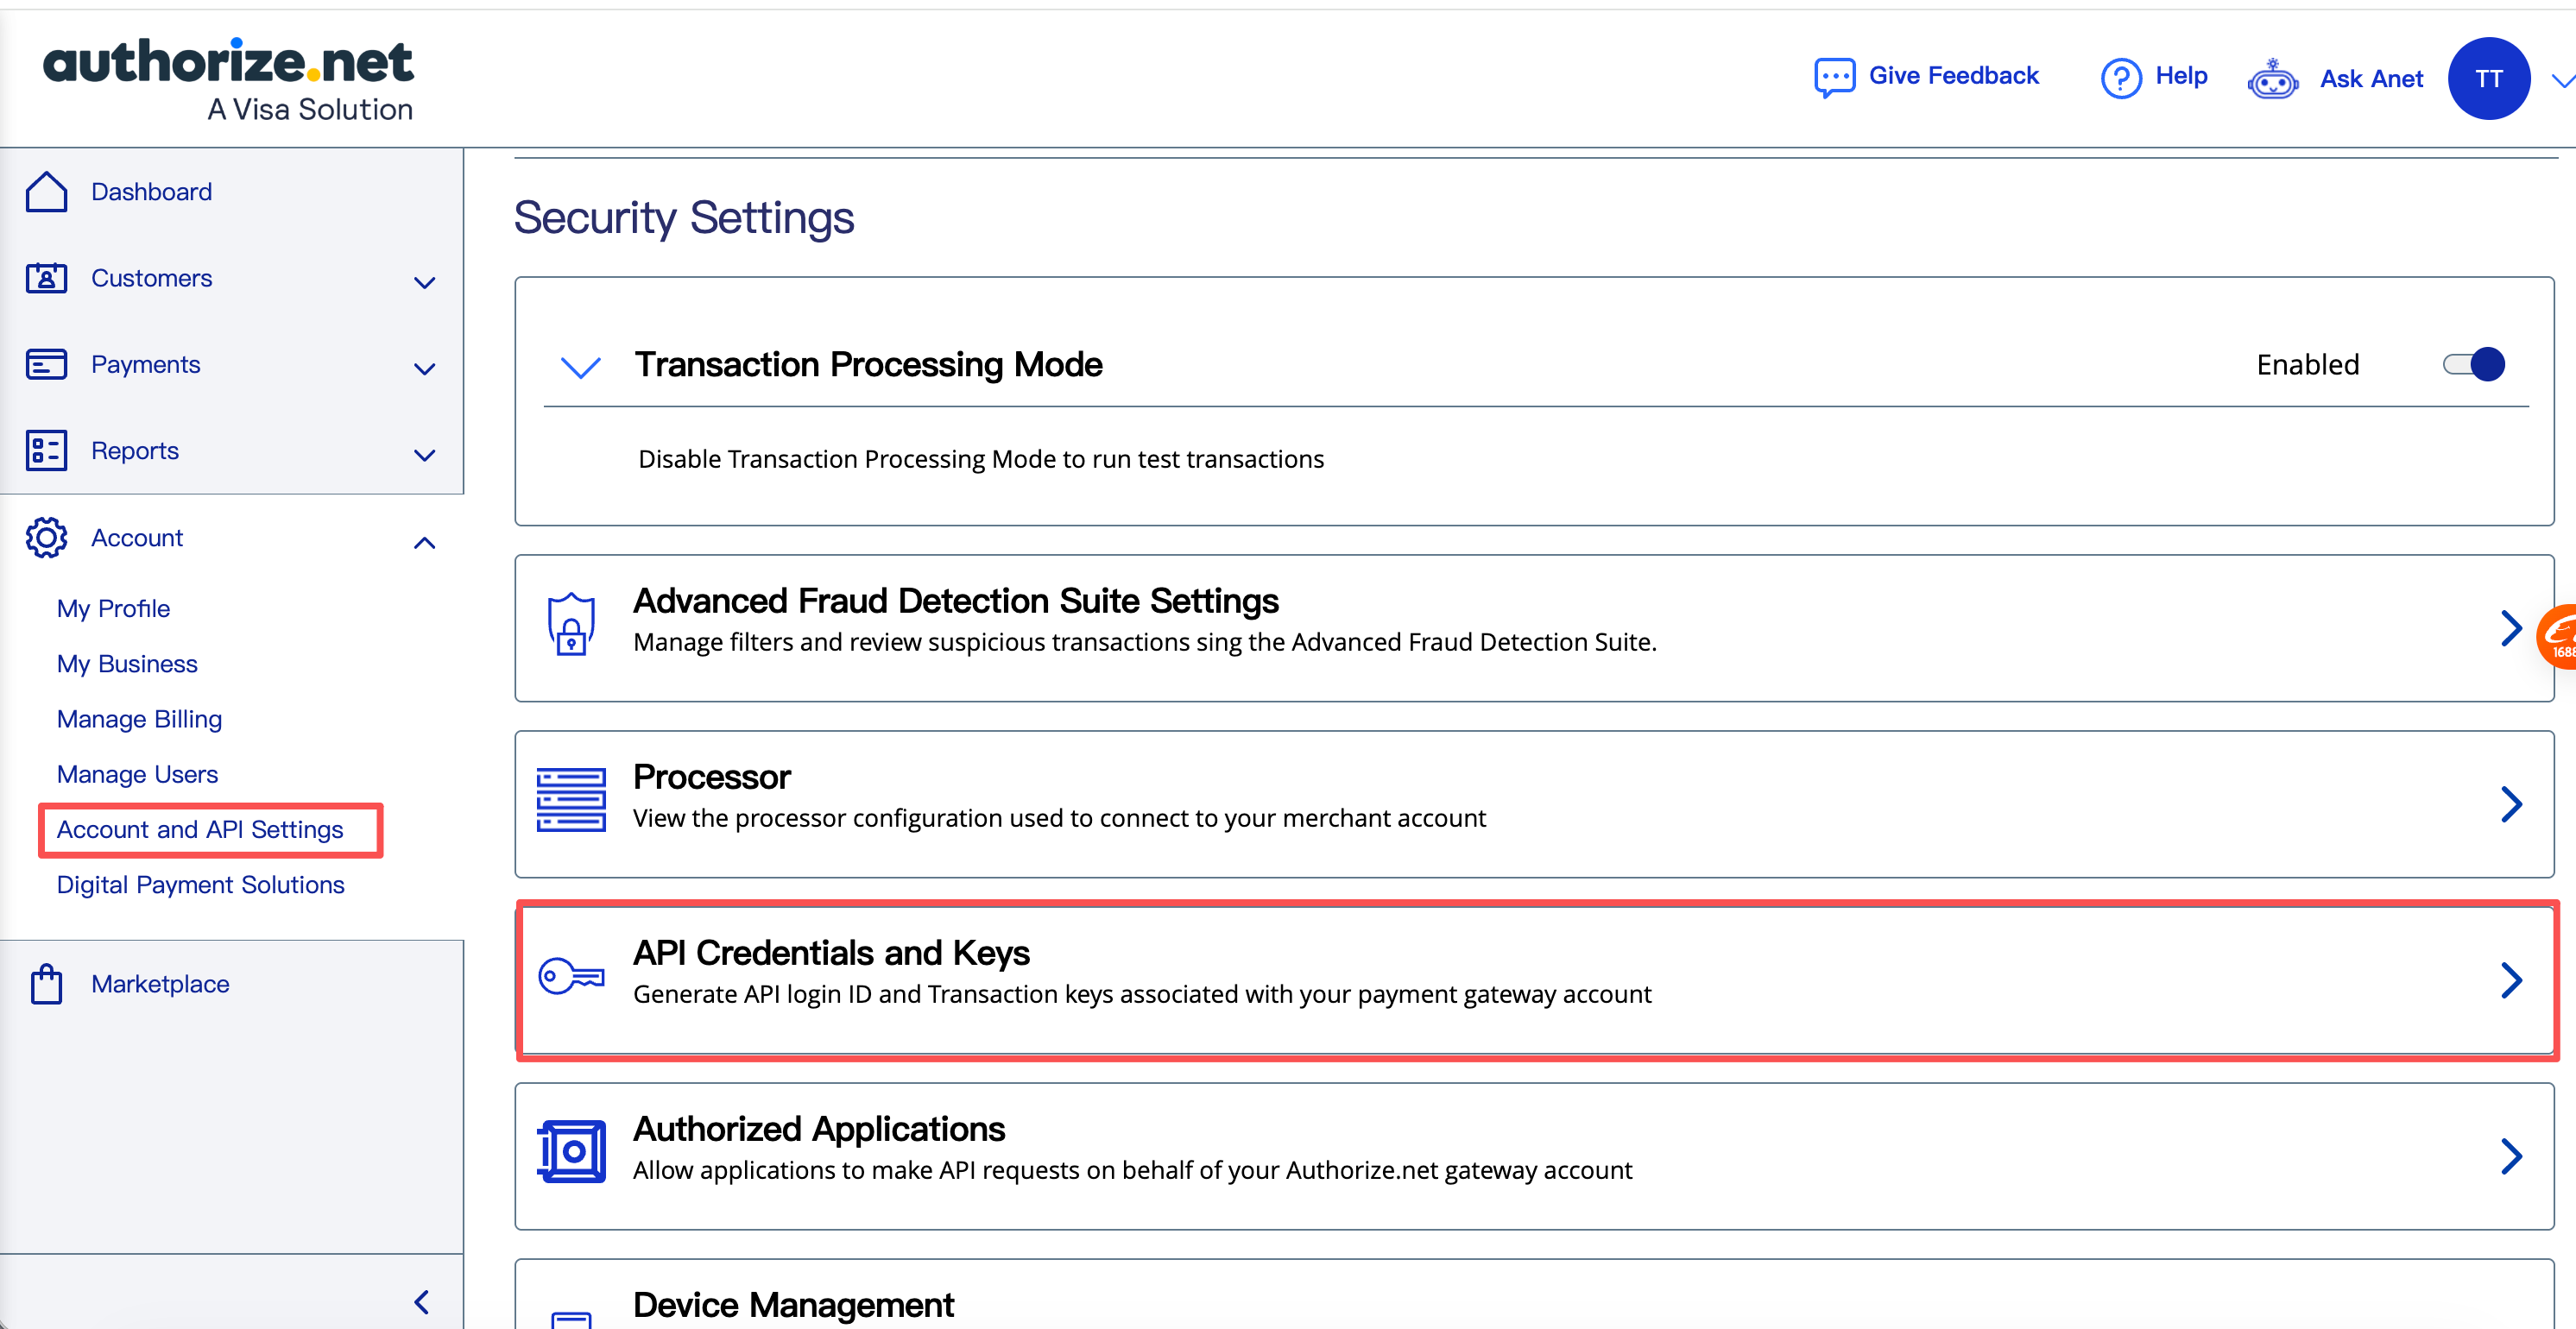
- Open Account in the left navigation.
- Select Account and API Settings.
- Select API Credentials and Keys.
3. Copy the API Login ID and generate a Transaction Key
On the API Credentials and Keys page:
- Copy the displayed API Login ID.
- Under Transaction Key, select Generate New Transaction Key.
- Complete Authorize.Net's identity verification if prompted.
- Copy the complete Transaction Key when it is displayed.
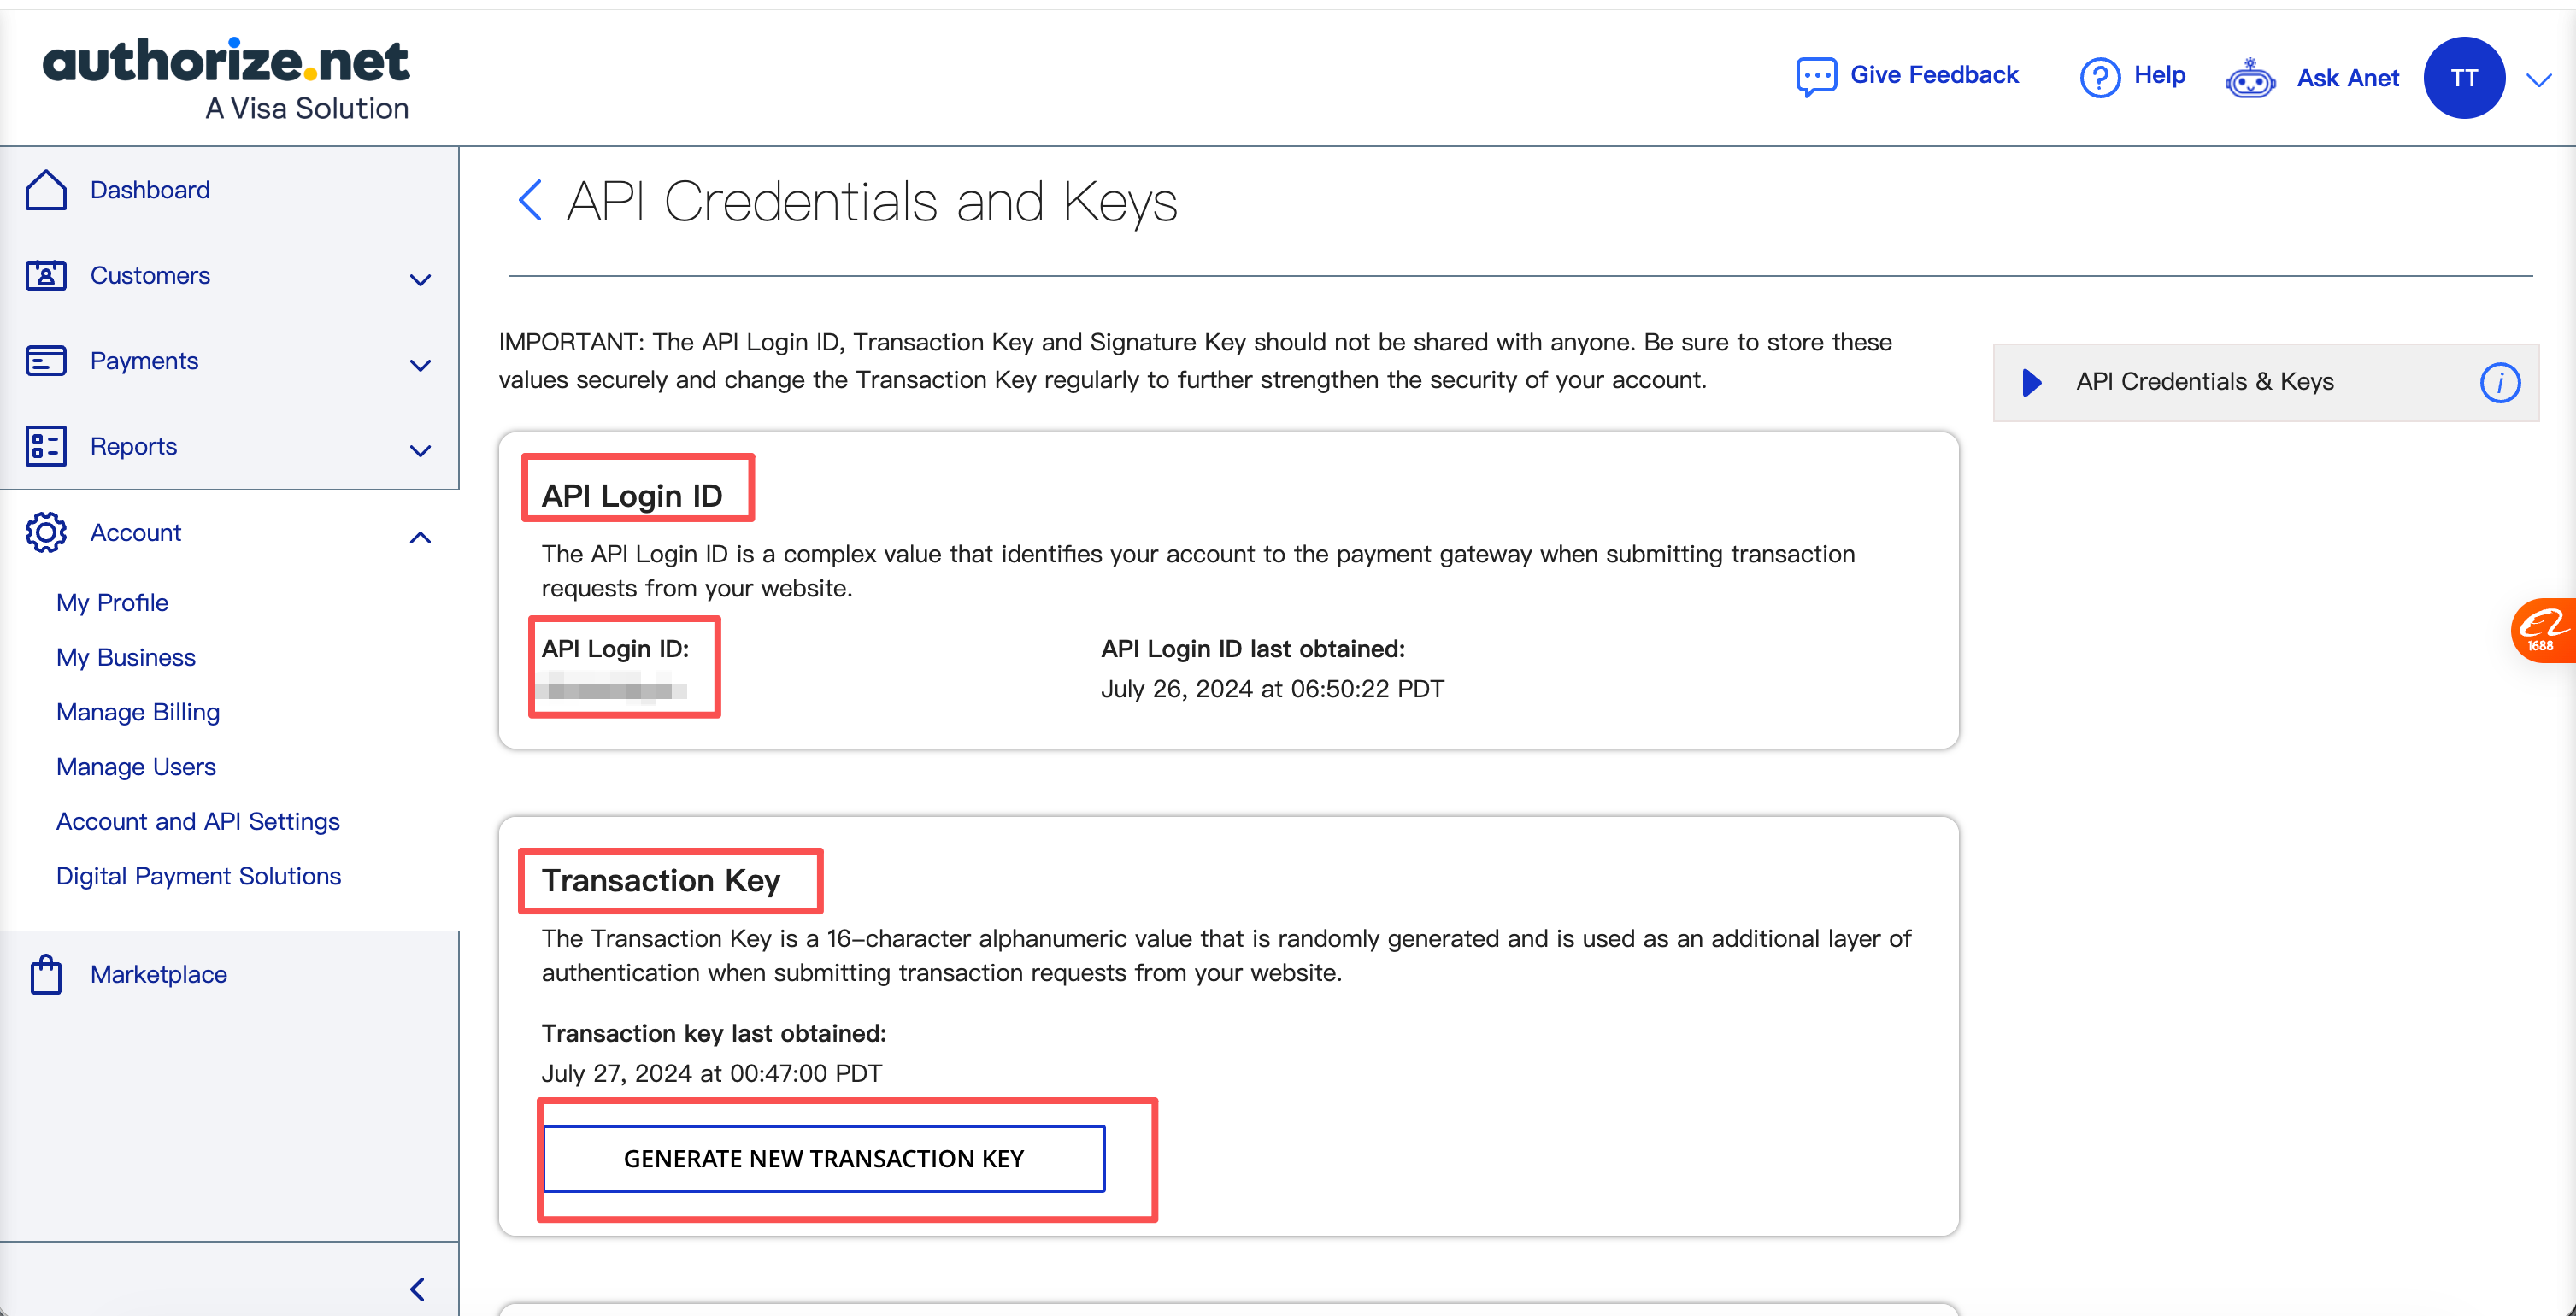
Generating a new Transaction Key can invalidate the key used by an existing integration. Update the EFundPay connection immediately and coordinate the rotation before changing a production key.
4. Generate the Webhook Signature Key
On the same page, scroll to Signature Key and select Generate New Signature Key. Complete identity verification if requested, then copy the entire key.
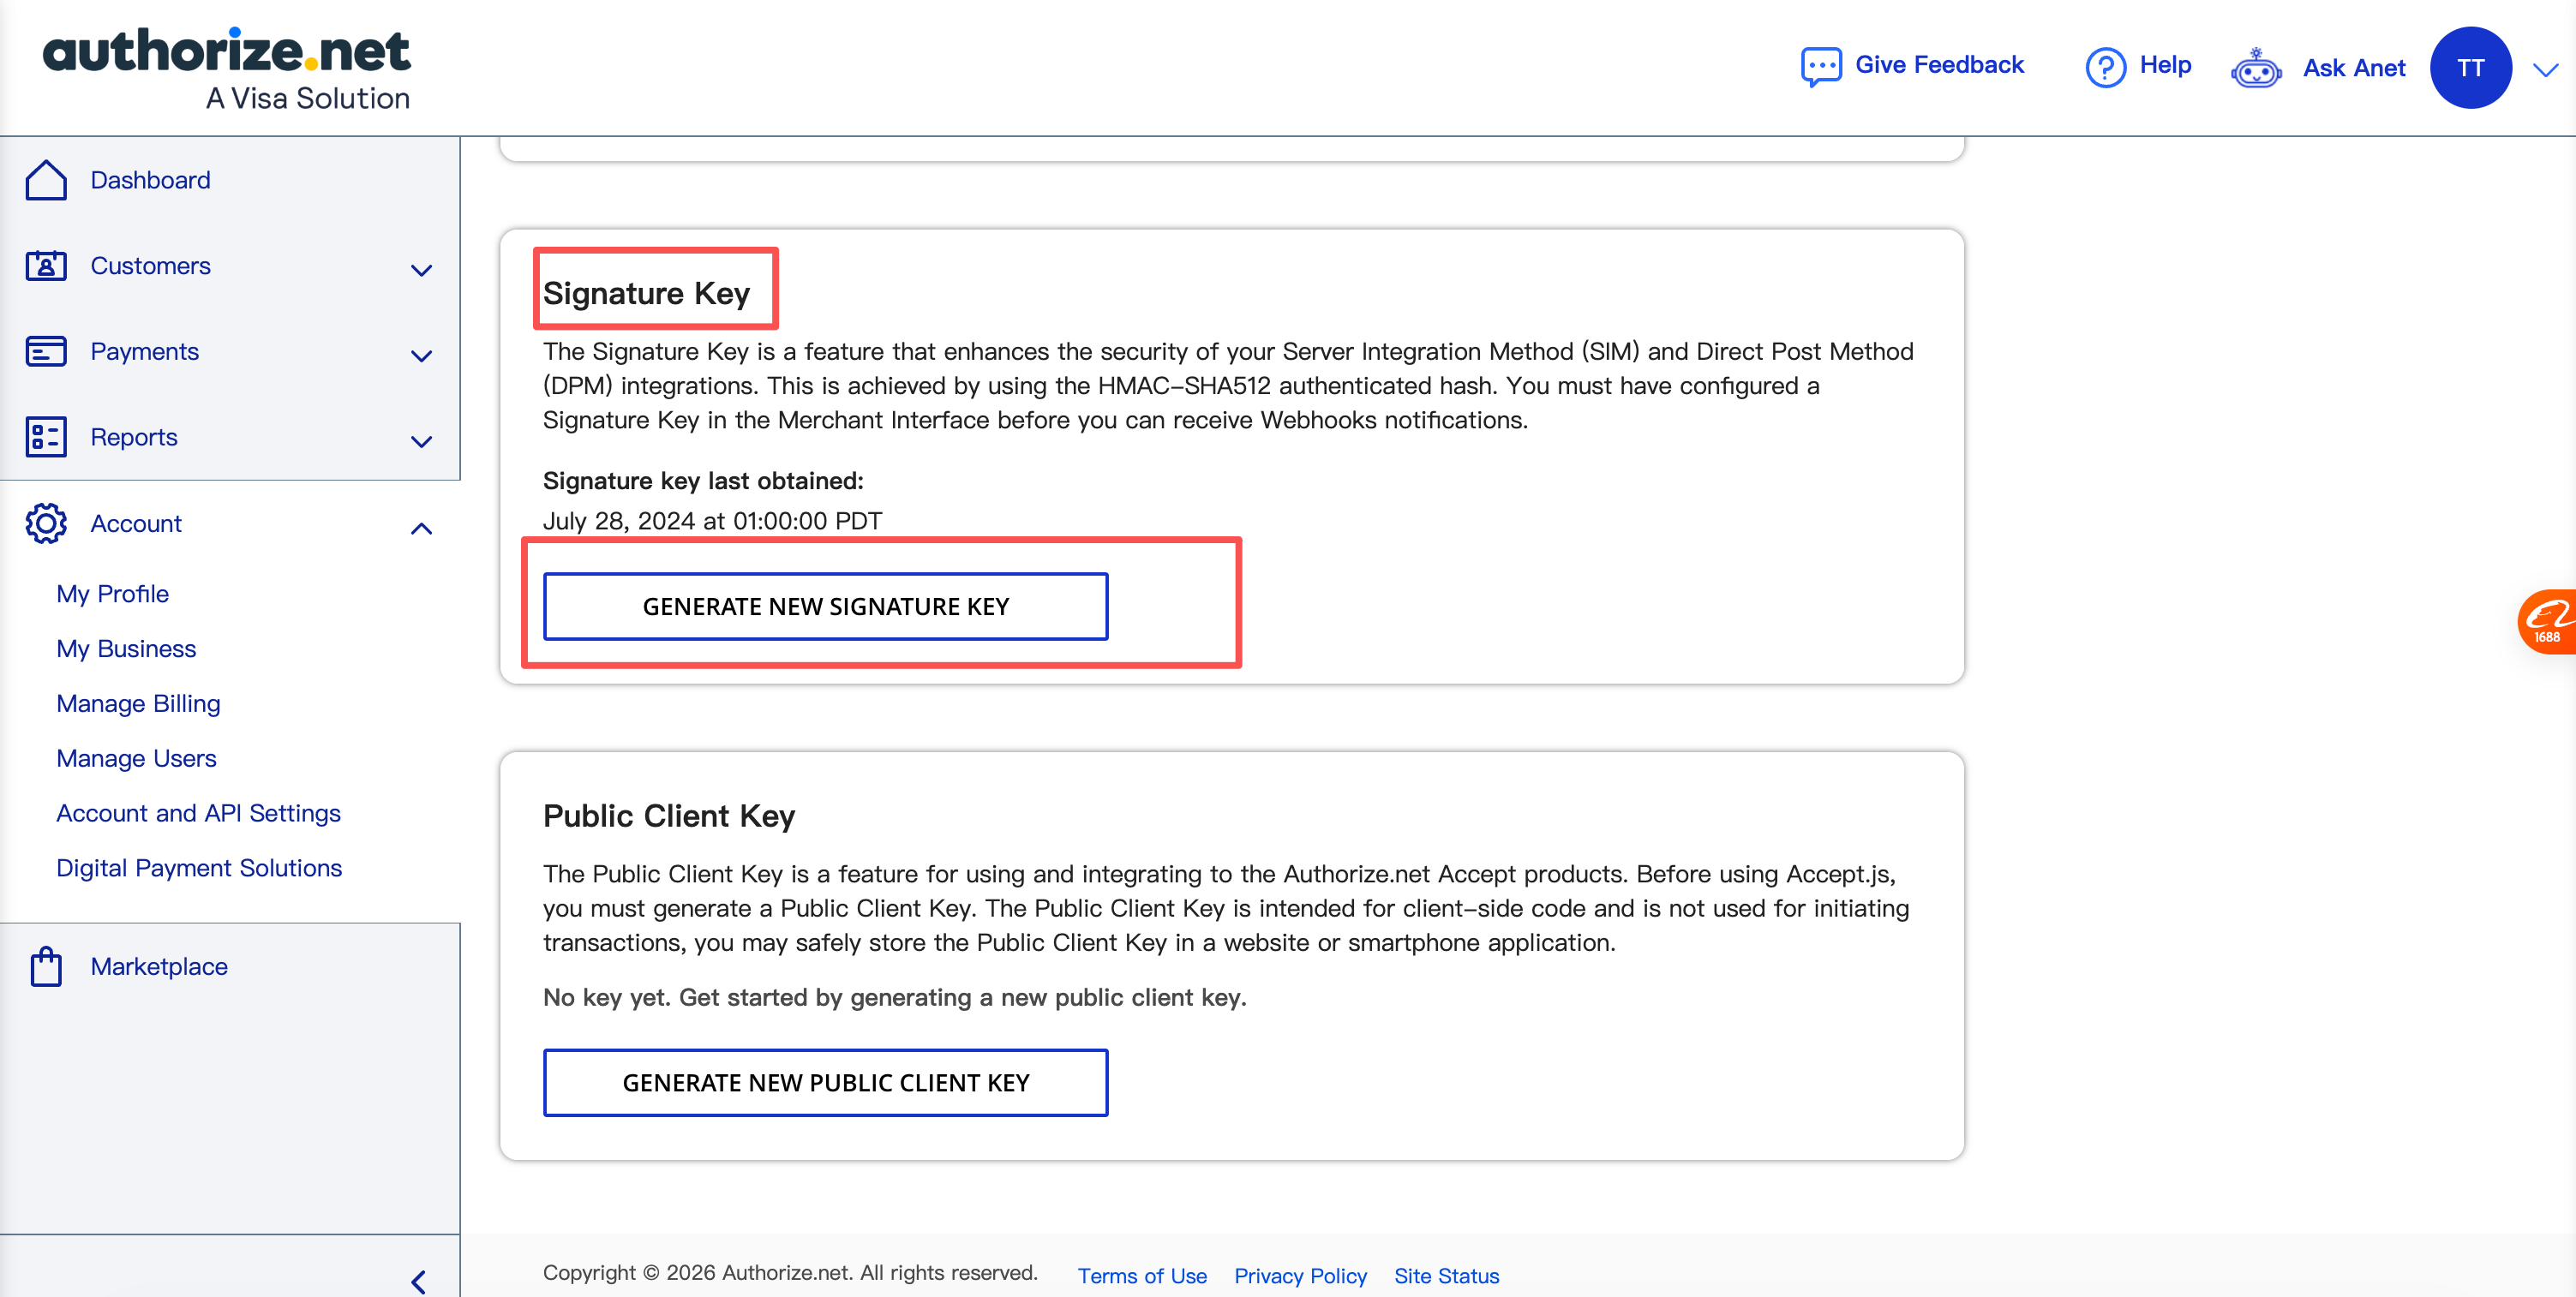
Enter the key itself in EFundPay. Do not add the sha512= prefix used by Authorize.Net's X-ANET-Signature HTTP header. The expected Signature Key is a 128-character hexadecimal value.
5. Configure the required EFundPay webhook URL
EFundPay relies on Authorize.Net webhooks to verify and apply asynchronous payment, refund, and void results. This step is required even when API credentials have already been saved.
In the Authorize.Net Merchant Interface:
- Go back to Account → Account and API Settings.
- Scroll to Webhook Notifications and select Webhooks.
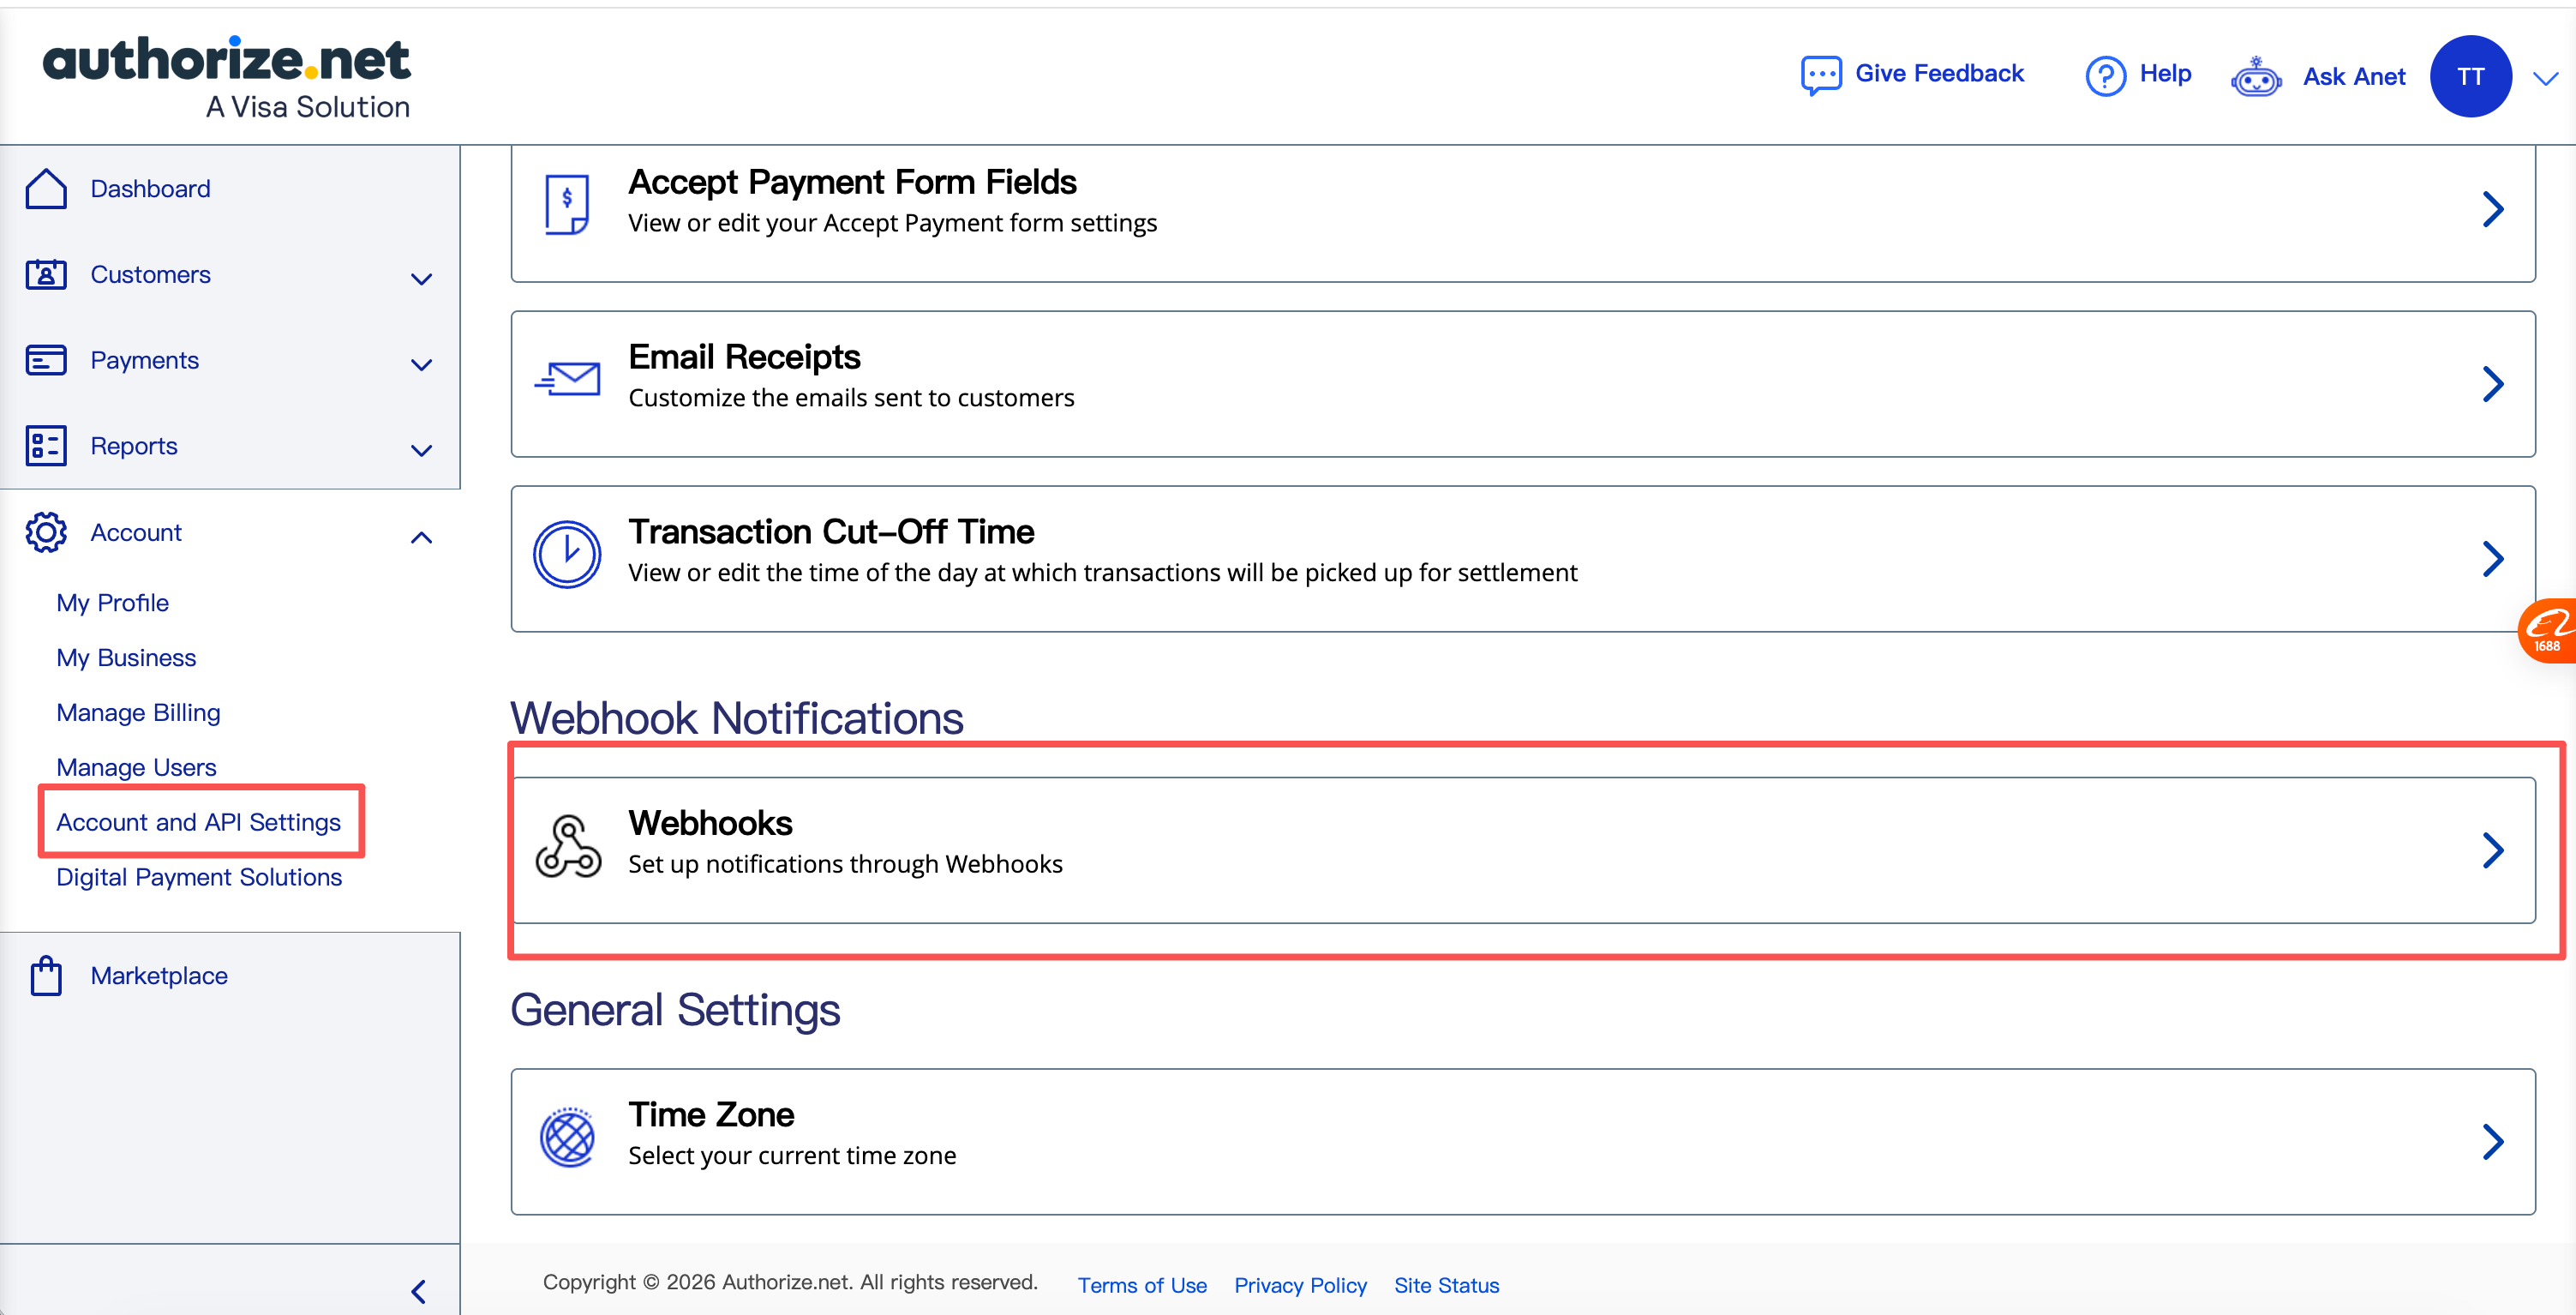
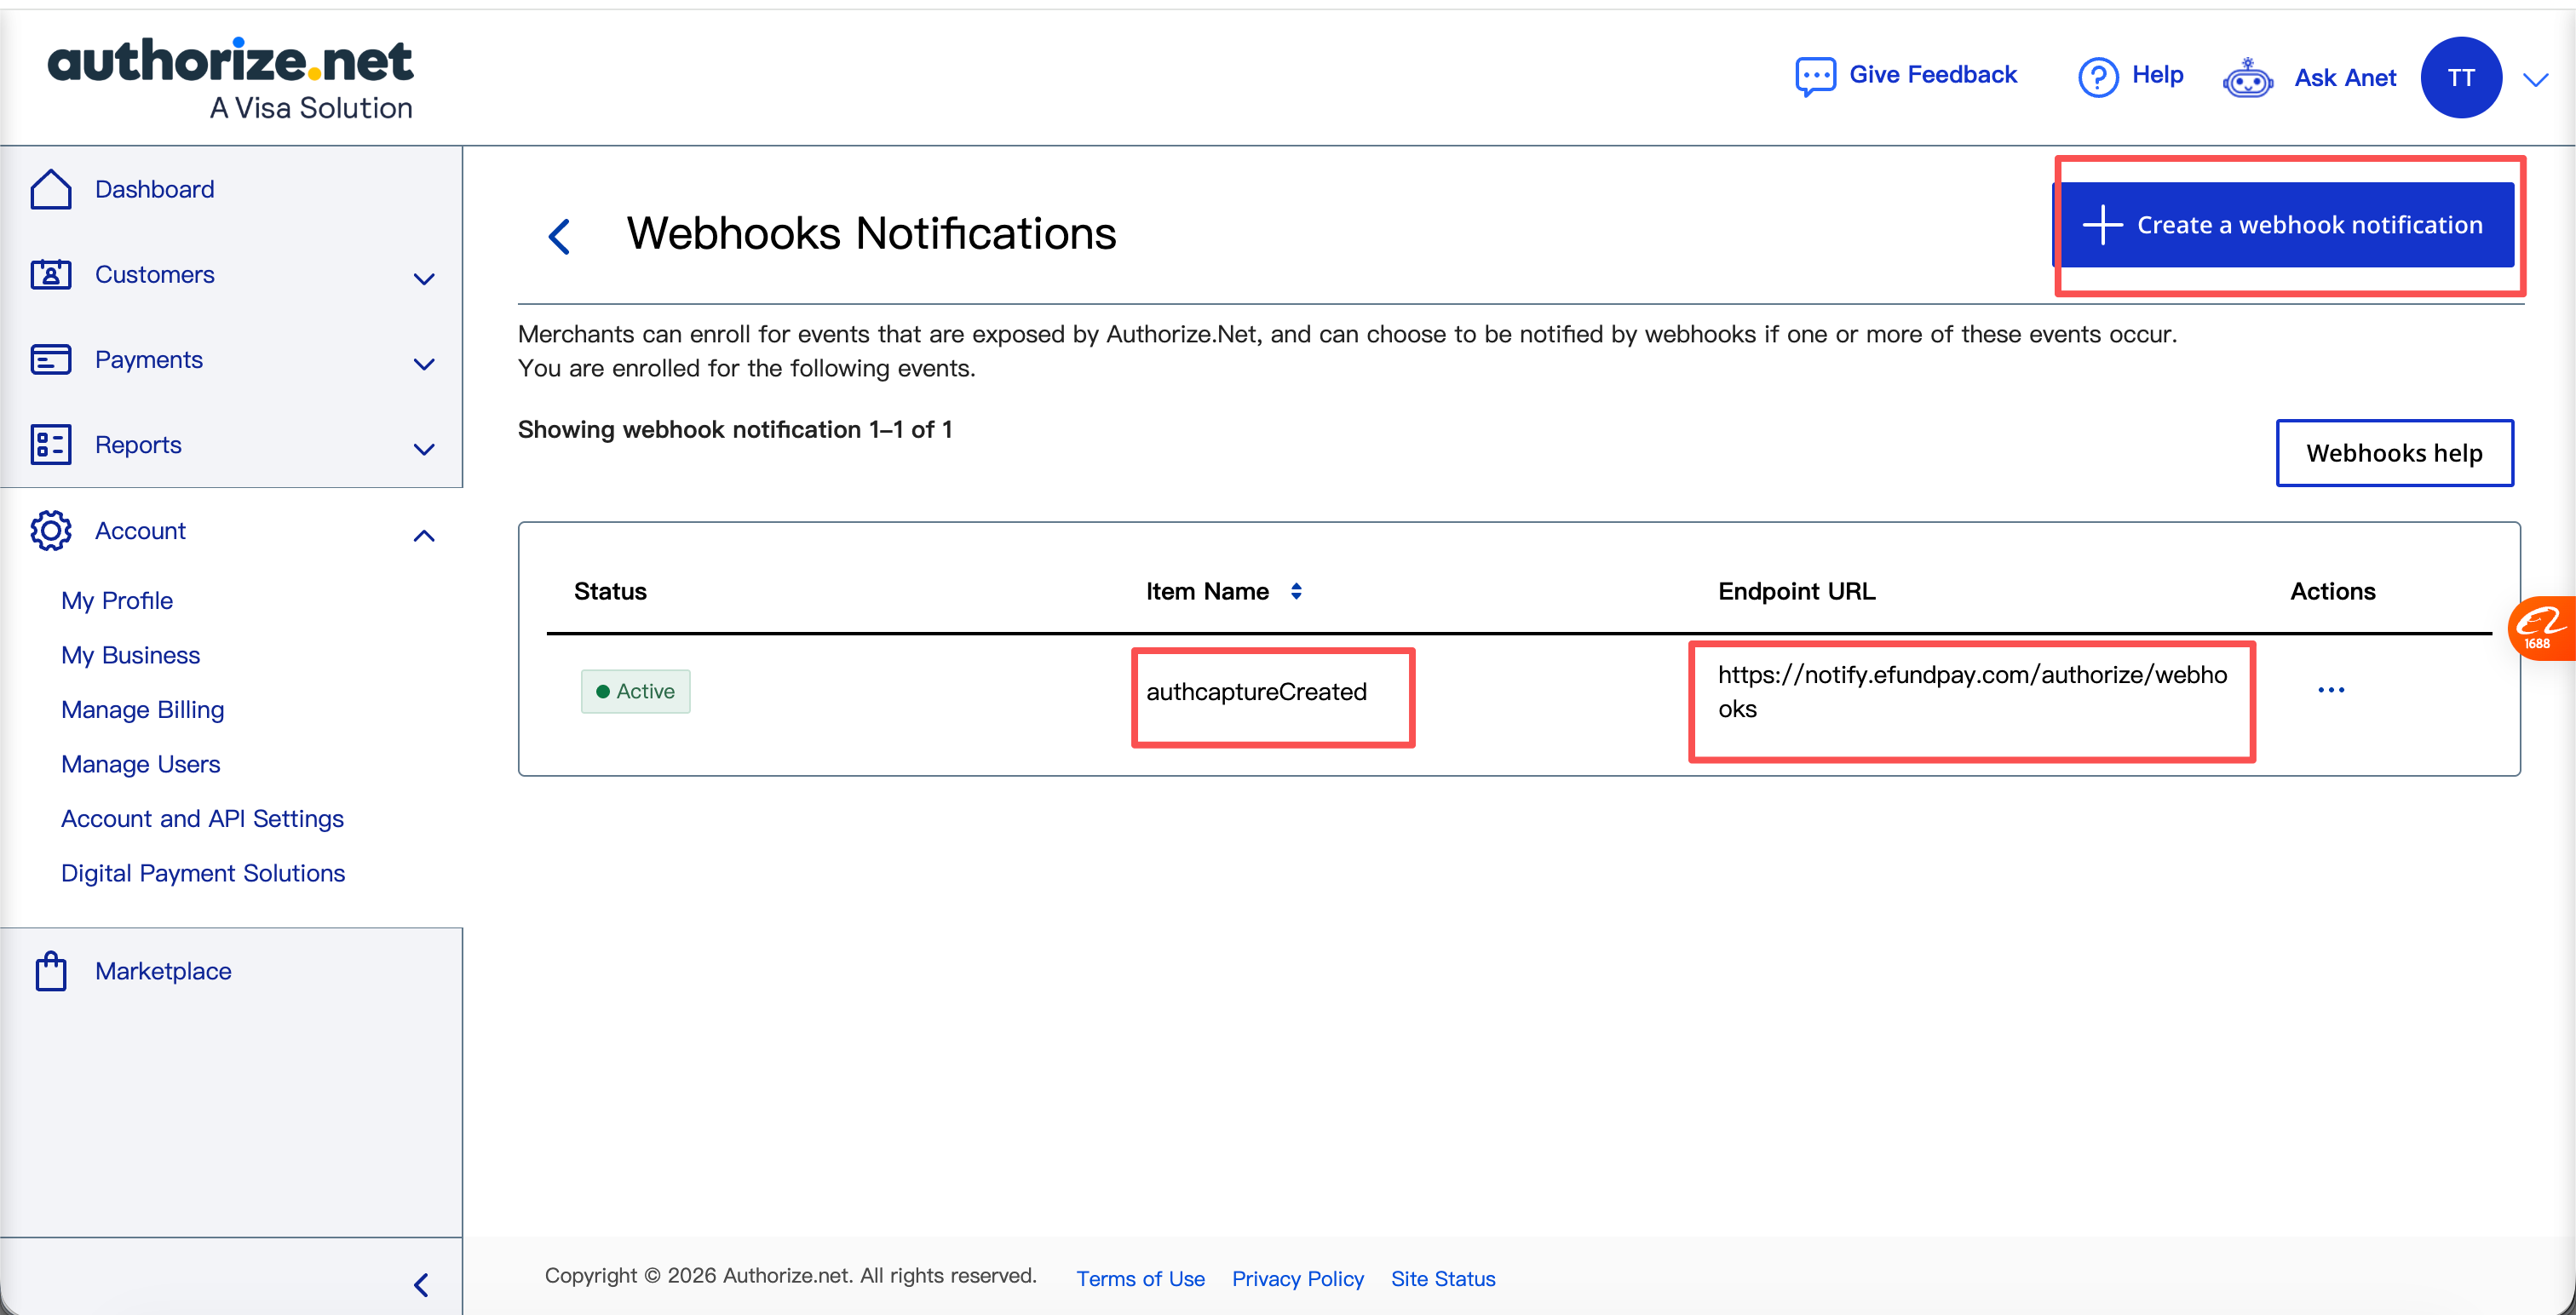
- Select Create a webhook notification.
- Set the endpoint URL exactly to:
https://notify.efundpay.com/authorize/webhooks
- Set the notification status to Active.
- Subscribe to these event types:
| Authorize.Net event type | EFundPay use |
|---|---|
net.authorize.payment.authcapture.created | Confirms an authorization-and-capture payment. |
net.authorize.payment.refund.created | Confirms a refund for a settled transaction. |
net.authorize.payment.void.created | Confirms that an unsettled transaction was voided. |
Select all three events in one notification when the interface supports multiple selections. If it allows only one event per notification, create three active notifications using the same EFundPay endpoint URL.
Use https://notify.efundpay.com/authorize/webhooks exactly.
After saving, verify that the notification is Active and that Endpoint URL shows the EFundPay address.
6. Save the connection in EFundPay Dashboard
In EFundPay Dashboard, open Connections → Your connections, locate Authorize.Net, and select Configure. Complete the form as follows:
| Dashboard field | What to enter |
|---|---|
| Reference name | A name that helps your team identify this account, such as US sandbox - Authorize.Net. |
| Environment | SANDBOX or PRODUCTION; it must match the Authorize.Net Merchant Interface used in step 1. |
| Payment methods | Select Card. |
| Card brands | Select only the brands enabled for your Authorize.Net merchant account. |
| API Login ID | The value copied in step 3. |
| Transaction Key | The value generated in step 3. |
| Webhook Signature Key | The Signature Key generated in step 4. |
Select Save. When editing an existing connection, leave a masked secret field unchanged to keep the saved value. Use Clear saved value only when you intentionally want to remove and replace that credential.
7. Verify the setup
Before going live:
- Confirm the EFundPay connection is saved for the intended merchant account and environment.
- Confirm every required Authorize.Net webhook notification is Active and points to the EFundPay endpoint.
- Create a sandbox transaction and verify that its status is updated in EFundPay after Authorize.Net sends the webhook.
- Test a void. Test a refund after the sandbox transaction becomes eligible for refund.
- Repeat the credential and webhook setup in the production Authorize.Net account before changing the EFundPay connection to
PRODUCTION.
Troubleshooting
| Symptom | What to check |
|---|---|
| Authentication failed | Environment, API Login ID, and Transaction Key must all belong to the same Authorize.Net account. |
| Webhook is not received | Notification status must be Active, the required event must be selected, and the endpoint must be https://notify.efundpay.com/authorize/webhooks. |
| Webhook signature verification failed | Regenerate or recopy the Signature Key, remove whitespace, and do not include sha512=. Then update the EFundPay Webhook Signature Key. |
| Payment updates but refund or void does not | Add and activate the refund.created and void.created event subscriptions listed above. |
| Duplicate callbacks appear | Check for duplicate active Authorize.Net notifications using the same event and endpoint. Authorize.Net may also retry a notification until it receives a successful response. |
For an overview of the connector, see Authorize.Net overview.